Trying to install a driver for old hardware, or otherwise unsupported hardware, on Windows 8? I bet you’ve run across something that kept you from actually install the drivers.
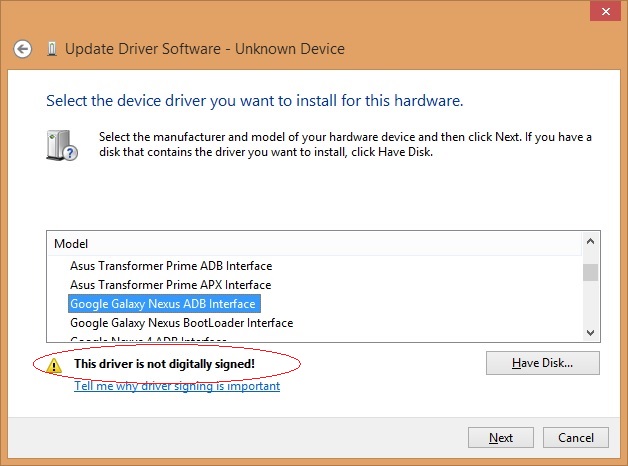
While playing with my Galaxy Nexus, I ran into an issue where I could not install the ADB driver found in the Galaxy Nexus Toolkit. It told me the driver was not digitally signed, and after trying to use it, it said windows encountered a problem.

This is because Windows 8 enforces driver signing. If it’s not signed, Windows 8 says tough! Well, I found a couple ways to get by this, keep reading to find out how…
Option 1 – My Preferred Option
One easy way is to reboot into the advanced boot options menu and disable the driver signing requirement. It is not persistent and will be gone after you reboot. Since this isn’t something done often, I don’t mind running this every now and then.
Step 1:
reboot into the advanced boot options menu. You can either use the gui or cli, I prefer cli
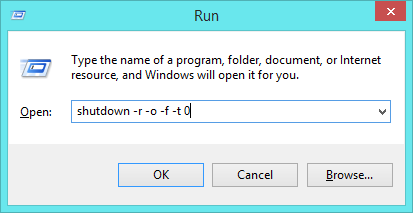
Typical force reboot now command, except with the addition of the -o, which is for boot Options. You can also do this through the PC Settings gui by dragging your mouse to bottom right and go to settings (or hit Win + i), click Change PC Settings, select General on left, then Restart Now on bottom right.
Step 2:
It will walk you through a series of questions or options to figure out what you’re trying to do
Click Troubleshoot
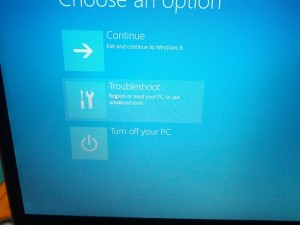
Then Advanced Options
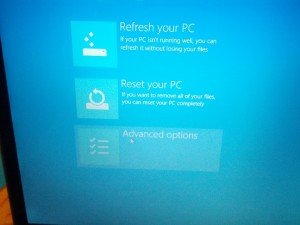
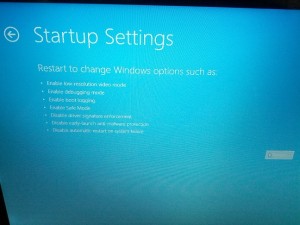
Then Startup Settings

Lastly, confirm that you’re wanting to change some stuff
Step 3:
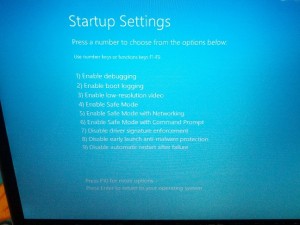
Now here’s what you’re presented with after the reboot. You’ll want to hit F7 and it will boot into Windows
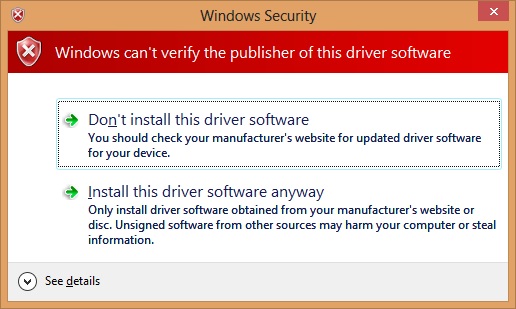
Once in Windows, go ahead and install your driver again and you’ll likely see something like this:
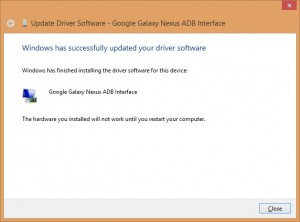
So now your driver is installed and you should get this:
Option 2
I don’t like to use this one because it may watermark the bottom right of your screen with Test Mode. You’ll know driver signing is disabled, though, and will persist after reboots. You’ll need to run some bcdedit.exe commands, which BCD is Windows’ Boot Configuration Datastore.
Step 1
Run these commands from an elevated command prompt (Win + x is nice for this):
bcdedit -set loadoptions DDISABLE_INTEGRITY_CHECKS

bcdedit -set TESTSIGNING ON
Reboot and you’re good. Take note there are two (2) D‘s in DDISABLE.
Now install whatever you like. If you ever want to revers what you did, just run the opposite:
bcdedit /deletevalue loadoptions

bcdedit -set TESTSIGNING OFF
I’ve read reports that you only need to turn TESTSIGNING ON and don’t need the DDISABLE_INTEGRITY_CHECKS, but I use option 1, because I don’t like the ‘Test Mode’ on the screen.
Option 1 Step 1 is wrong.
On Windows it is not -o but /o and /o is not possible without /r
So this Run command doesn’t work.
Sorry, I thought I had replied to this previously.
The screenshot is wrong, I typed that because that’s how I shutdown my machine.
It should be “shutdown -r -o -f -t 0”, I’ll fix that shortly.
And yes, you can use either the – or a / in the shutdown command.
Very nice! A lot of pictures! I like that!
For test mode, I like using bcdedit.exe and I only set the testsigning option, no integrity checking. It works every time. I am using Windows 8.1 Pro at the moment. I advise everyone to disable test mode once the much needed drivers are installed. The previously installed drivers will still load, even after you disable test mode. Moreover, you will be able to re-install the same drivers that you had previously installed with test mode enabled, without having to re-enable test mode again.
Disabling test mode will also remove the watermark for you. If you leave the test mode enabled and you don’t like the watermark, you can use a utility called Universal Watermark Disabler to remove it.
I personally prefer using advanced boot options. But starting with Windows 8 the F8 key does not allow me to enter this menu. However, the /o switch of the shutdown command is very useful, taken that you can boot into Windows in the first place… of course. I kind of miss the F8 key boot trick.