This process works for both VCF 9.0 and 9.1 (including 9.0.1 and 9.0.2), but VCF 9.1 does things a little differently, and VMware’s documentation on setting up an offline depot has lots of stuff us home-labbers don’t really use, need, nor want:
https://techdocs.broadcom.com/us/en/vmware-cis/vcf/vcf-9-0-and-later/9-1/lifecycle-management/binary-management-for-vmware-cloud-foundation/set-up-an-offline-depot-web-server-for-vmware-cloud-foundation.html
But setting up the offline depot isn’t all that bad…
Read on to see how I did it.
Depot Webserver
I installed a base Ubuntu 24.04 server, added a second disk that’s 2TB (thin provisioned, 67510.4 MiB are required minimum for all packages, 9.0.2 is 81418.3) and mounted it under /depot, then installed lighttpd:sudo apt update
sudo apt upgrade
sudo apt install lighttpd
I chose lighttpd because you really don’t need to do any post-install setup. I changed the default directory to my /depot mount:sudo vi /etc/lighttpd/lighttpd.conf
Set server.document-root to the drectory of your choosing, or leave it where it is if you have enough space, but remember the path because we’ll need it later. I chose “/depot/www”: server.document-root = "/depot/www"
From there I set the hostname to match my DNS record (not that it matters, you can go by IP instead): sudo hostnamectl set-hostname offline-depot.thephuck.lab
sudo systemctl restart systemd-networkd
sudo systemctl restart systemd-resolved
Now the webserver is prepped and ready for the VCF Download tool
VCF Download Tool
The new VCF Download Tool docs can be found here: https://techdocs.broadcom.com/us/en/vmware-cis/vcf/vcf-9-0-and-later/9-1/lifecycle-management/binary-management-for-vmware-cloud-foundation/download-bundles-to-an-offline-depot.html
You can pull it from the Broadcom downloads page, steps below (C&P from the above link):
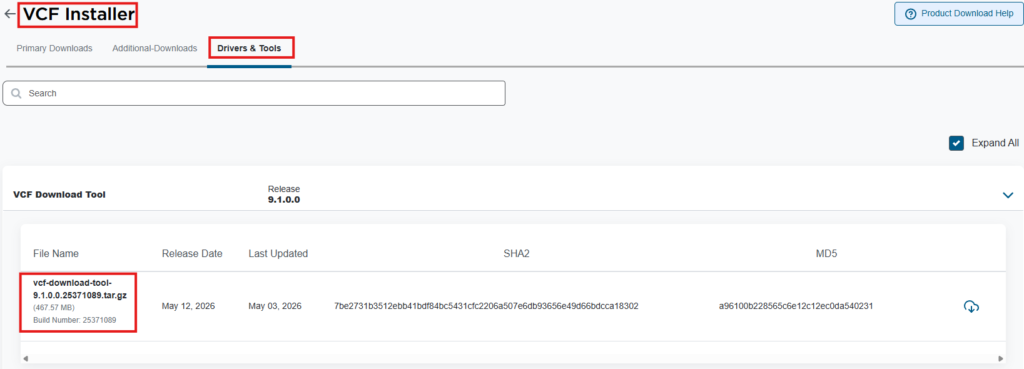
- Download VCF Download Tool 9.1 or later to a machine with Internet access or the offline depot web server.
- Log in to the Broadcom Support Portal and browse to My DownloadsVMware Cloud Foundation.
- Click the version of VMware Cloud Foundation to which you are upgrading.
- Click Drivers & Tools.
- Click the download icon for the VCF Download Tool.
- Extract vcf-download-tool-<version.build>.tar.gz to the offline depot web server.
- Navigate to the vcf-download-tool-<version.build>/bin/ and confirm that you have execute permission on all folders.The directory includes both the Bundle Transfer Utility (lcm-bundle-transfer-util) and the VCF Download Tool (vcf-download-tool).
This is where things diverge a little from the 9.0 days. SCP it over to your depot linux server and extract the gzip in it’s own folder, mine is in /home/luke/vcf-downloader
Once it’s extracted, cd into the bin directory where vcf-download-tool is located and run the following:./vcf-download-tool configuration generate --software-depot-id
This will give you a code we’ll need in the next step
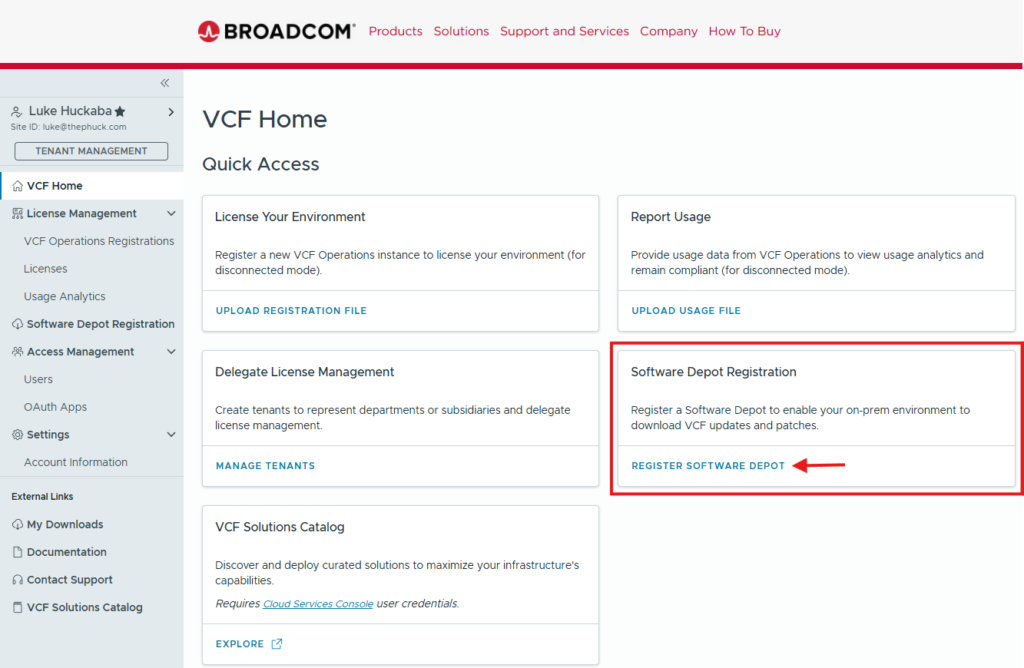
VCF Business Services console
You need to log into to VCF Business Services console (this works for VCP Certification Production Licenses found here: https://support.broadcom.com/group/ecx/alpine-certificate).
You’ll need to navigate to the Software Depot Registration section:
This is where you’ll need to enter the Software Depot ID that was generated from vcf-download-tool above: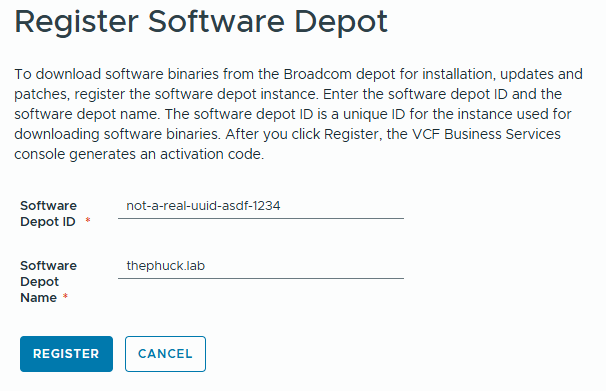
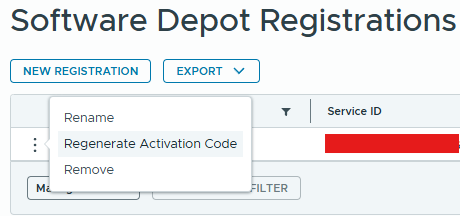
You will be greeted with an Activation Code window you’ll need to save on your offline depo server. I dropped mine in /home/luke/activation.txt. If you happened to close it out without saving, you can regenerate a new Activation Code by selecting the three dots and click Regenerate Activation Code: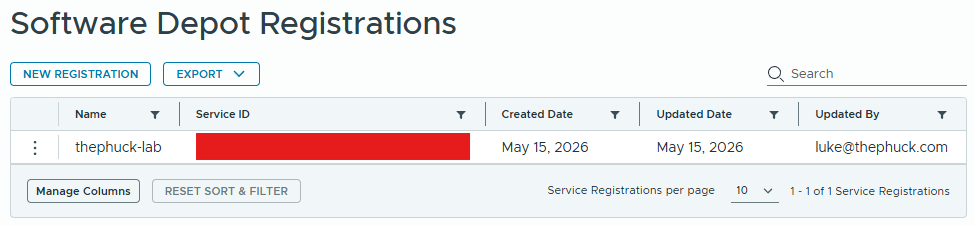
Syncing the bits
Now that we’ve got our offline depot registered in the VCF Business Services console, we can move on to syncing the installation bits.
From the depot server in the directory where the vcf-download-tool is, run the following:./vcf-download-tool binaries download --sku VCF --vcf-version 9.1.0.0 --depot-download-activation-code-file /home/luke/activation.txt --type INSTALL --automated-install --depot-store /depot/www
This is pretty self explanatory, but binaries download is exactly as it sounds. You could also do binaries list to verify connectivity and see a list off all the bits it’s about to download. I had to change ownership of the /depot/www directory to my username to have write access:sudo chown -R luke:luke /depot/www/
This still allowed lighttpd to server it up without issue. You can change --sku to VVF if you only wanted those bits, but --vcf-version needs to be “9.1.0.0” (or 9.0.0.0, 9.0.1.0, 9.0.2.0, etc), then provide the path to your activation file, --type of INSTALL could also be UPGRADE. For a deeper explanation of the command line options, see their documentation here:
https://techdocs.broadcom.com/us/en/vmware-cis/vcf/vcf-9-0-and-later/9-1/lifecycle-management/binary-management-for-vmware-cloud-foundation/what-is-the-vcf-download-tool-/vcf-download-tool-binaries-commands.html
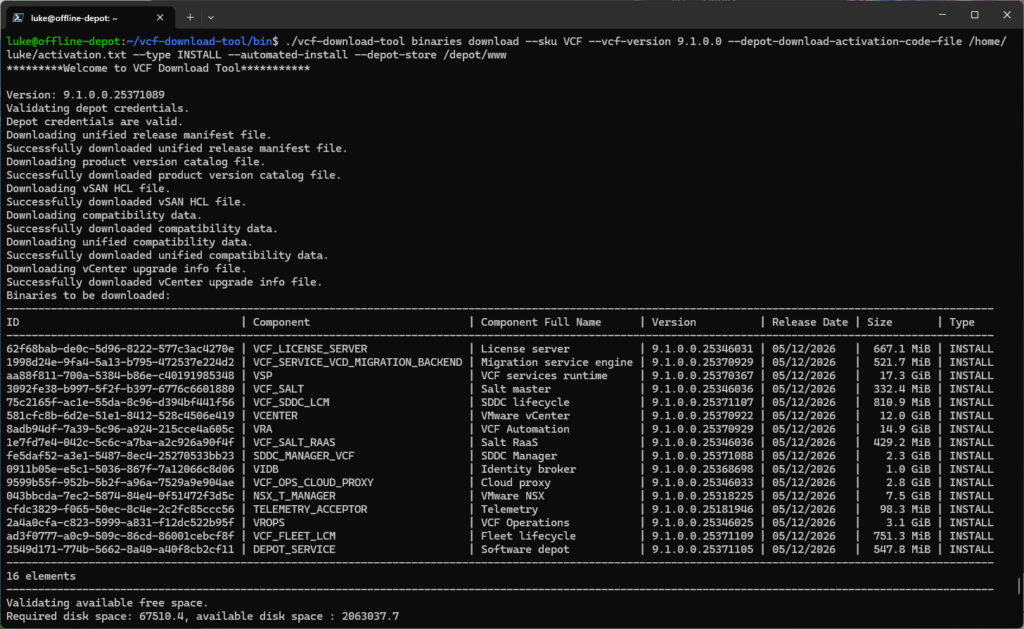
At the bottom of that image you can see where it says it’s validating free space and 67510.4 is required, which I’m assuming is in MiB, since all packages are listed in both MiB and GiB. It takes a while, so go grab a coffee or something while waiting.
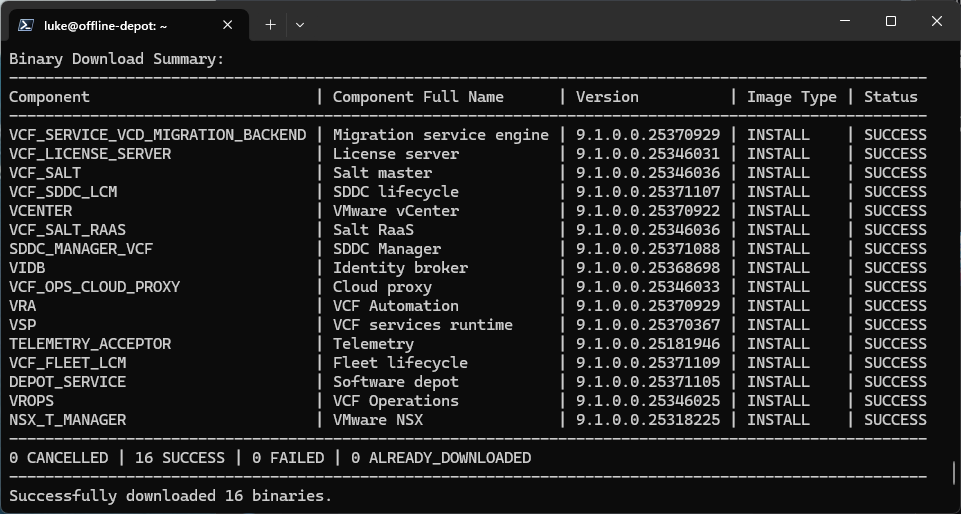
Success!
VCF Installer Offline Depot setup
Now let’s hop over to our VCF Installer running in the SDDC manager VM. Don’t forget to follow William Lam’s post around disabling HTTPS requirements and allow HTTP with no username or password:
To enable the VCF Installer to allow a non-HTTPS connection to your offline depot, you will need to add lcm.depot.adapter.httpsEnabled=false to following configuration file /opt/vmware/vcf/lcm/lcm-app/conf/application-prod.properties
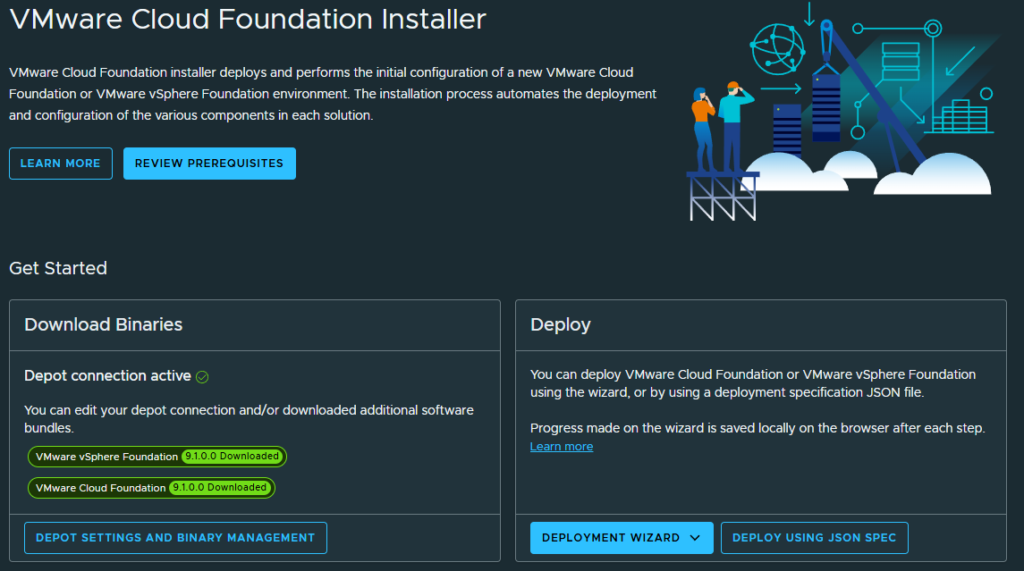
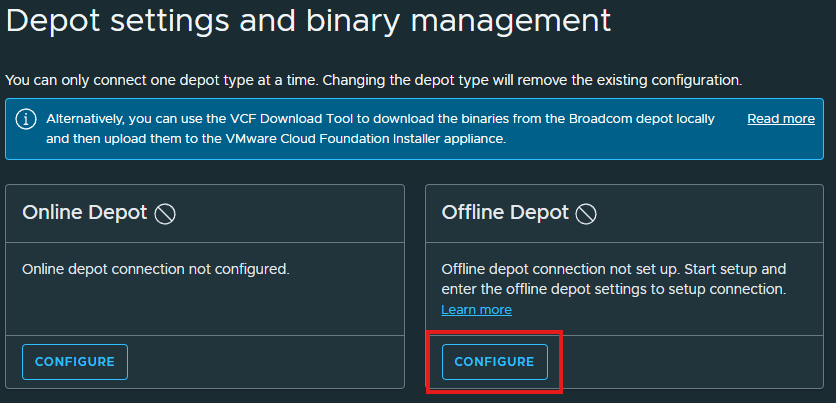
At the VMware Cloud Foundation Installer main page, click the DEPOT SETTINGS AND BINARY MANAGEMENT button:

Now click CONFIGURE:
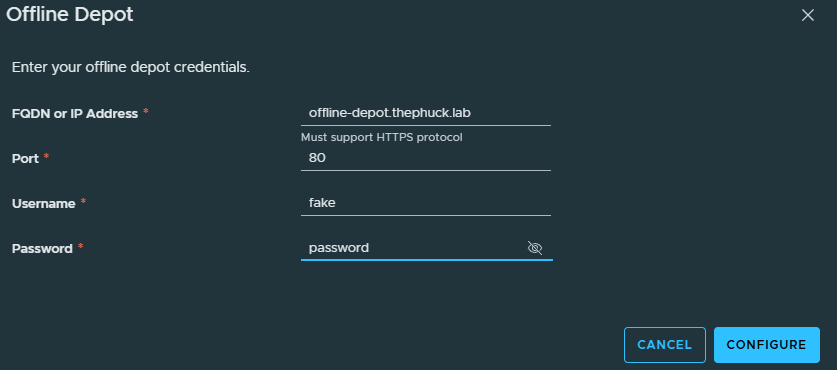
And add in your URL or IP, port is 80, and make up a username & password, since lighttpd isn’t validating any authentication:
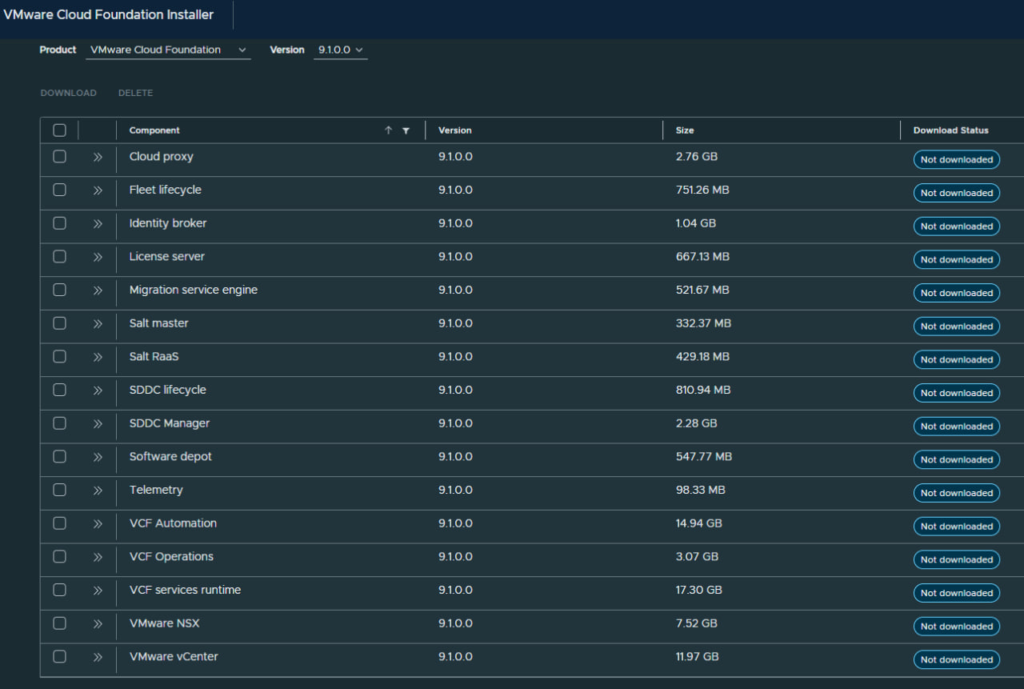
Hit the checkbox to select them all, then download and wait a bit, go grab another coffee, you’ve earned it.
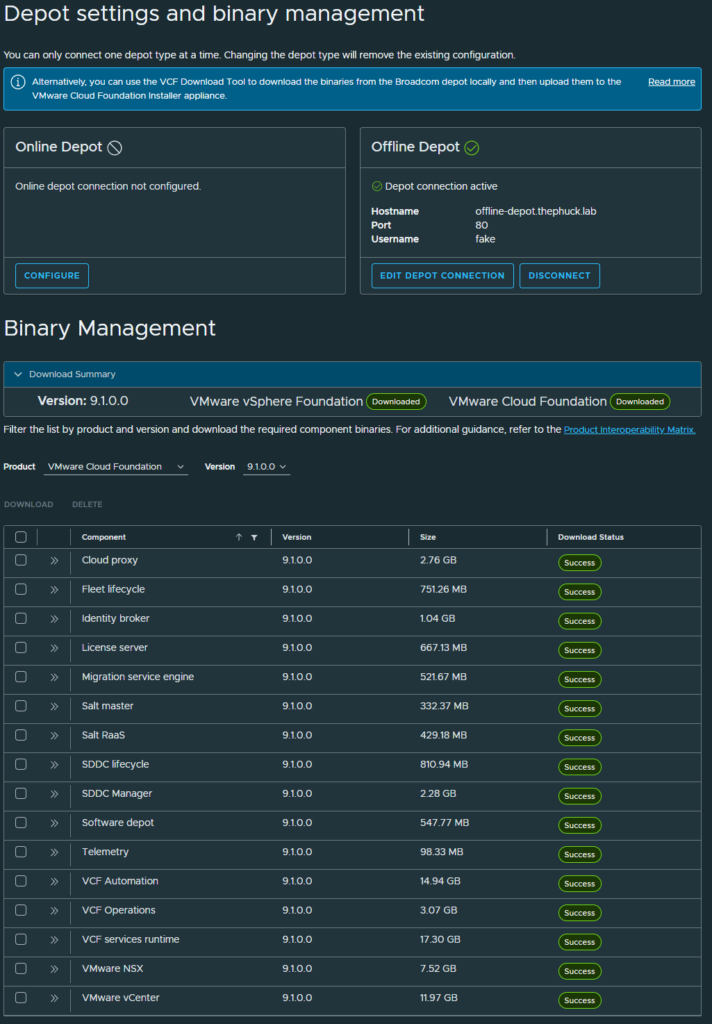
Now that we’re done with that, click RETURN HOME and you’re ready for deploying VCF 9.1! Yay you!
And again, this same exact process works for VCF Installer 9.0.2 and has the option to deploy 9.0, 9.01, or 9.02.