VMware has exploded into Software Defined Networking (SDN) with NSX, it’s no secret why it’s their fastest growing product, either. Through the use of all the components within NSX, you can be well on your way to a fully Software Defined Datacenter (SDDC) accomplishing things like automated deployments of networks, edge devices, NAT rules, firewall rules, and the list goes on.
There are so many features & functions of NSX that it can be extremely overwhelming to research how to utilize it. You begin to look at hardware networking requirements, switch & router support, overlay networks, logical switches, and before you know it, you’re completely lost. I know, I’ve been there.
Luckily you don’t have to jump straight into the NSX pool without first checking the water or how deep it goes. You can start small, dip your feet in, if you will, before taking the dive into SDN.
Enter NSX Distributed Firewall
The Distributed Firewall (DFW) doesn’t have a long list of dependencies, it really only has two: NSX Manager & Firewall host VIB.
That’s it! You don’t need to adjust routing, change MTU on all your switches or routers/firewalls, or re-IP anything, you’re ready to begin!
Now, you may be asking yourself, “What’s the use case for the NSX DFW?” You’ve got a bright & shiny new tool and you’re looking for a problem to fix. Luckily, there is an extremely powerful usecase for the NSX DFW that no one can say no to: Microsegmentation. I know you’ve heard that term, and you probably know what it means (or at least have some idea what it means), but I’m going to tell you briefly what it means in one sentence: Microsegmentation is breaking up environments into smaller groups, specifically networking. Think centrally managed firewall for EVERY VM in your vCenter.
Did you know the majority of attacks come from from within your own network? It’s true! What’s even more scary is what if your management network is flat (same subnet) and everyone can talk to everyone else on that network? Then, if you just have a router to other networks without firewalls in between, the risk is huge. If one single machine is somehow compromised on that single segment, that ‘bad actor’ can target any machine adjacent to it, on any port, and likely any other machine in the environment. That’s one heck of a blast radius!
Hello Microsegmentation
Through the use of VMware NSX’s DFW, you can segment to the level of granularity you need, isolating each VM, virtual network adapter, application, or user identity, if you wanted to go that far. To keep this post short, I’m only going to cover segmenting the VMs.
In a traditional deployment, you have a perimeter device, usually a physical firewall, that separates your environment from the rest of the world. The problem with that is once someone, or some thing, is inside the perimeter, it’s an open network from there. Companies may build an internal DMZ, or high security module or zone, that’s firewalled off from the rest of the network, and that’s better than nothing. ESXi is already inspecting packets that go in and out of the host, through the virtual switch layer, which icrosegmentation builds upon that by leveraging the virtualization platform that’s already handling VM traffic. At a high level, network-style ACLs are pushed to the ESXi distributed firewall kernel module and every VM on that ESXi host gets those ACLs in front of each network adapter.
How do I plan for Microsegmentation?
Ultimately, the distributed firewall is that, a firewall. It has object groups just like any other firewall, which need to be populated. First, understand that NSX is aware of ALL VMs in your vCenter, and it discovers the IPs of those machines via VM Tools. You can also enable DHCP & ARP snooping to help that discovery, which is helpful if you have some appliances that don’t have VM Tools. Now, it’s completely unaware of anything outside of vCenter, such as office networks, physical servers, or any other network source.
First thing you’ll need are your grouping objects. What’s a grouping object? Simple, it’s a group of things, items the distributed firewall uses for it’s object groups.
IP Sets
Anything from a single IP, multiple IPs, range of IPs, subnets, and combinations of any of those.
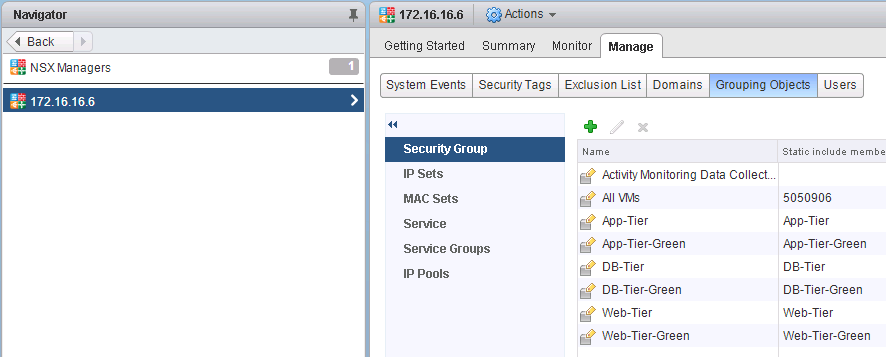
Security Groups
A Group of VMs, IP Sets, other Security Groups, and any combinations of those. Security Groups can be dynamic to include VMs based on name, Datacenter, Cluster, Security Tag, vSwitch, Port Group, Resource Pool, vApp, etc, or you can statically assign specific VMs. Security Groups also contain the IP Sets for systems vCenter isn’t directly aware of. You can’t create rules in Service Composer that target IP Sets, so you must create Security Groups which contain IP Sets.
Services
This is simply the port(s) & protocol required for communication. Each service can be only a single protocol, but can contain a single port, multiple ports, ranges, or combinations of those. If you need UDP & TCP, you’ll need to create a service for TCP and a separate service for UDP.
Service Groups
If you have a specific application that uses both TCP & UDP ports, you can create the individual services, then group them together in Service Groups. It is simply a group of services. You can nest service groups within a service group, although I wouldn’t recommend it.
Okay, so now that we have an understanding of what each grouping object is and how to use it, lets step through designing what our firewall rules will look like.
Step 1
Discover ALL interactions with ALL VMs, specifically keeping an eye on communications from outside your virtual world. A tool like vRealize Network Insights is useful here, but also your architectural diagrams for all your applications that I outlined here in DR planning come in to play. Once you’ve learned the external systems (traffic originating outside your virtual world), you can create IP Sets to house those individual systems. One example is your office network. vCenter isn’t aware of your office network, so you could create one or more IP Sets for your office networks that contain those subnets, and subsequently create a Security Group with those IP Sets. These even includes the networks where you ESXi hosts are if you’ll also include your vCenter in your distributed firewall deployment.
By the end of this step, you should have a clear picture of network traffic to & from all VMs in your environment, and the ports used.
Step 2
Create your grouping objects based on your discovery from Step 1. Start at the top and work your way down in this flow:
1. IP Sets – I like to break these up into groups based on application or consumer, and again, systems vCenter cannot discover on it’s own.
2. Security Groups – First, create corresponding Security Groups for your IP Sets. Then create security groups based on things vCenter knows about (vDatacenter, cluster, etc) and create a additional groups for each target application, and even groups for any compliance-related VMs. One for all Windows VMs will be helpful when allow authentication to external domain controllers.
3. Services – create the different services you’ll need, again, you’ll need different services for the protocol (TCP vs UDP, etc)
4. Service Groups – Group together those different services for your applications. Using Windows & AD as an example, a single Service Group can contain all the ports & protocols needed for authentication.
Step 3
Planning with Service Composer.
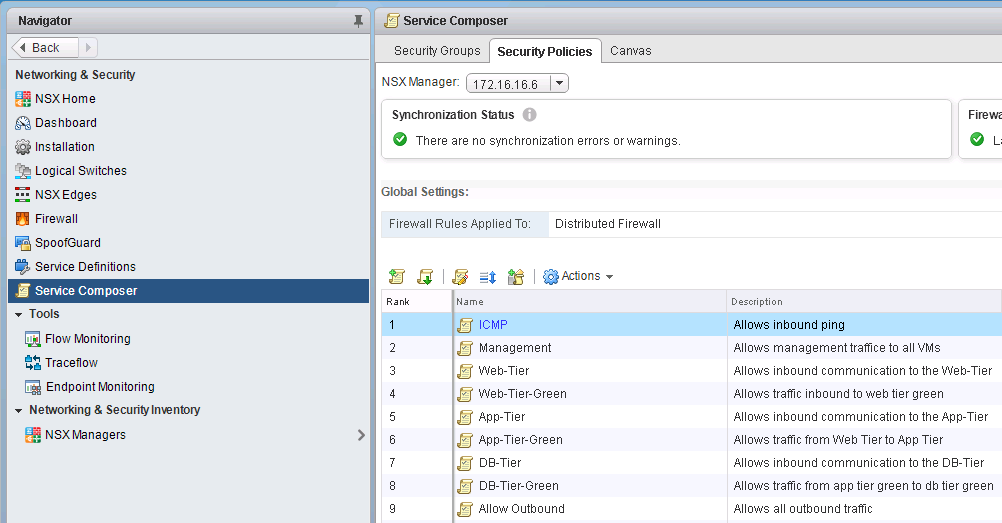
Why do I say planning? Because building policies in Service Composer actually doesn’t do anything, you have to apply those policies to security groups to build the firewall rules. In this step, don’t think of it as “application A” needs to talk to “application B”. Think of the service offerings that will be consumed within your virtual world. For instance, if you have a vROps cluster, that is a target service offering systems will consume via TCP 443. The desired outcome is to build a Security Policy that says “policy group” can access “vROps Cluster” on HTTPS. If your VMs are consuming an external resource, you’ll need the inverse of that policy, basically something that says vROps is allowed to talk to X, where X is any number of security groups, depending on the different things you want vROps to monitor (vCenter, ESXi hosts, network devices, storage, etc).
When building the Security Policies, you have to specify a source & target, where either, or both, is “Policy’s Security Group”. This can be extremely confusing, but if you think of it literally as something will consume this service, it will help. The something will translate to “Policy’s Security Group”, thus building a firewall template that you can apply to Security Groups later. Following the vROps reference, I know something will access vROps, so the Security Policy firewall rule will have “Policy’s Security Group” as the source, and the vROps security group as the destination, Service is HTTPS, and Action is Allow. Once you save that Security Policy, nothing really happens, you just built a template to easily allow specific groups to access your vROps instance.
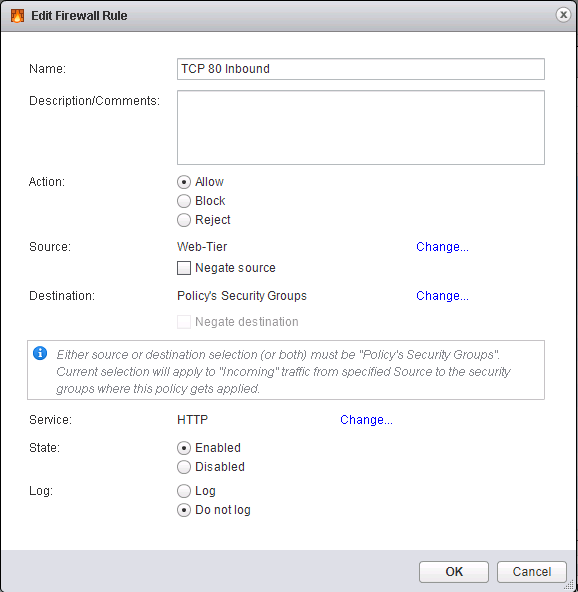
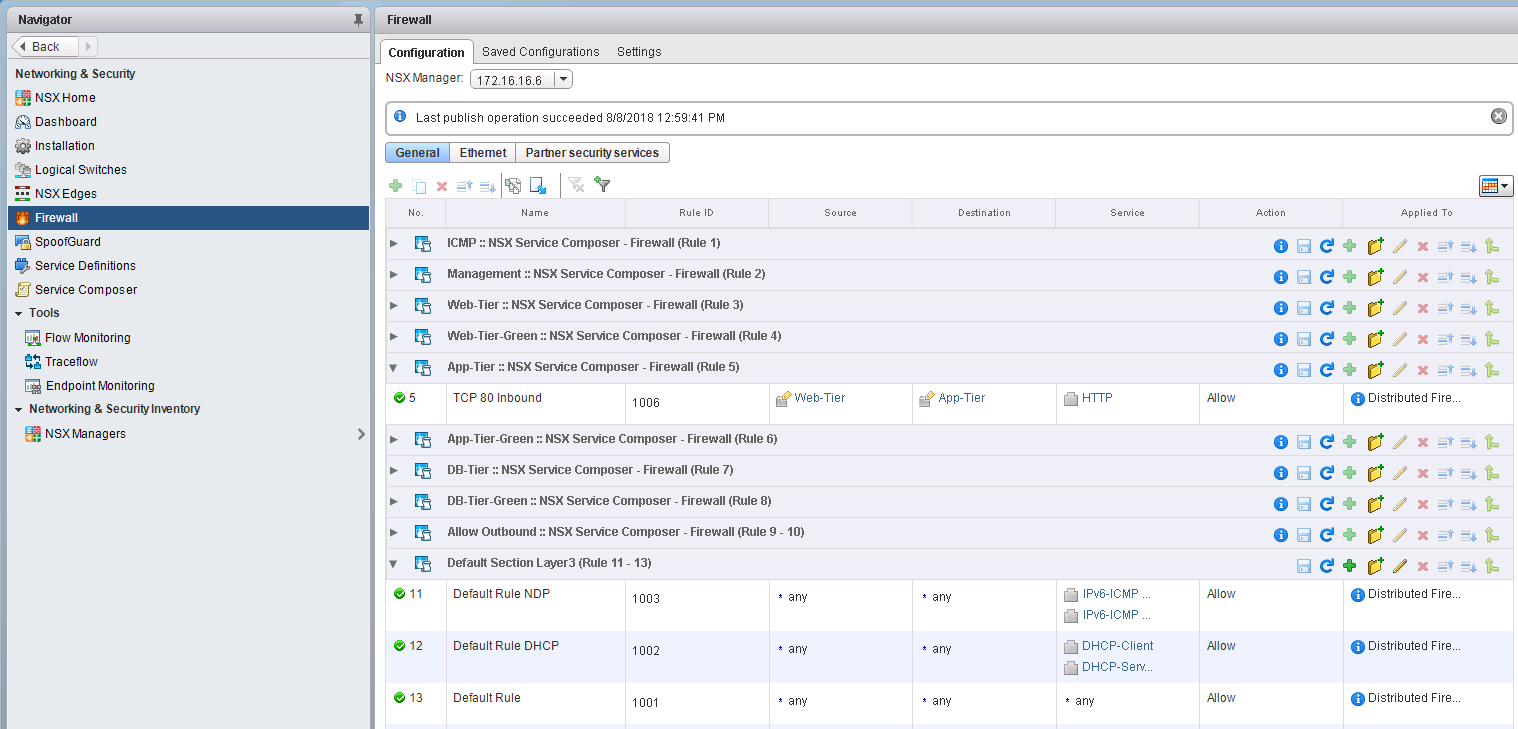
In this example, I’m saying my Web-Tier will access something on TCP port 80 (HTTP). I’m going to apply my App Security Group to this Policy, which will build a rule saying my Web-Tier can talk to my App servers over HTTP. If there are any other servers the web servers need to talk to on TCP 80, I would apply that Security Group to this Security Policy.
Step 4
Applying this new template, or Security Policy, is what actually creates & applies the firewall rules, but how do you apply this Security Policy? This is where the “Policy’s Security Group” comes in to play. In Service Composer, you’ll right-click your vROps Security Policy and select Apply Policy. The dialog box that pops up has a list of Security Groups, this is where you’d select “Office Networks” to allow anyone in your office(s) to access vROps.
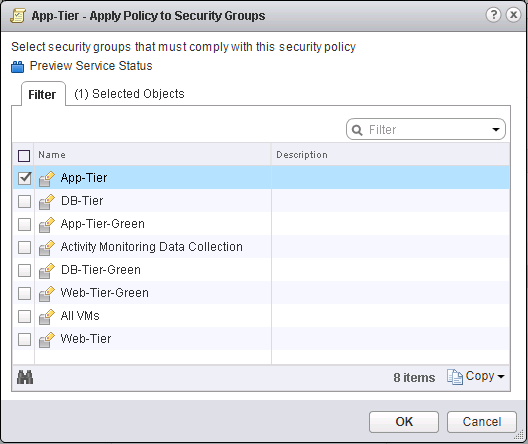
If you had very specific groups you wanted to allow access to vROps, this is where you do it. Say for instance, you have a VDI cluster for your engineers that’s on a specific subnet, you could allow only that subnet access. Multiple Security Groups can be applied, and all of them fall into “Policy’s Security Group”, so if you apply five (5) different security groups, Service Composer will create the firewall rules to allow all five of those groups to access your vROps cluster, and you only had to apply it once!
Step 5
Now the fun part, actually denying traffic. At this point, I hope you’ve fully validated your firewall rules applied by Service Composer. You’ll have to go to the Firewall section of Networking & Security to finish it off. The very last rule is know as the Default Rule, meaning if the network packet doesn’t many any rule preceding it, it gets filtered by this rule.
The Default Rule action is set to Allow by default, so applying crazy rules won’t actually block anything. I’d recommend you enable logging on the Default Rule and use something like Log Insight to monitor hits on that rule before enabling it. Also, one word of caution, put your vCenter in the exception list if it’s in the same cluster where you’re about to flip that Default Rule’s action to Block. You’ll be able to see if you missed something before severing ties with the rest of the world. If you don’t have Log Insight, you can ssh into each ESXi host and do a tail -f on the log file to see what’s hitting it. By default, the NSX Manager & NSX Edges are hidden from the exclusion list and firewall rules aren’t applied to them. You may want to brush up on the API call to disable the distributed firewall on the NSX Manager in case you block access to vCenter. Yes, I did that…more times than I care to admit.
Validation
You can also view the rules built by applying Security Groups to Security Policies in the Firewall section of Networking & Security. Each policy will create a new section in there with “NSX Service Composer” in the name, which makes it easy to see how they’re actually applied. You cannot edit any of the rules created by Service Composer, those can only be modified through Service Composer. If you need to adjust any ordering, you can rearrange the Security Policies in Service Composer to match your needs, as well.
Hopefully you now have a clearer picture of how VMware NSX’s DFW works and how you can build your own microsegmentation strategy. If you have any questions, feel free to reach out!